thank you both for such nice messages, I’m so glad you like my art…!! hopefully I can help at least a little bit!
anon 2) my brush settings can be found here! anon 1) wrinkles can get pretty complex! it depends on the type, weight, thickness, and cut of the fabric, whether the character is in motion, etc; I wish I could get into everything, but it’s a huge subject that I don’t think I could possibly cover…!! but I can at least give you some very very basic tips on building up a dress (and the lace underneath!)
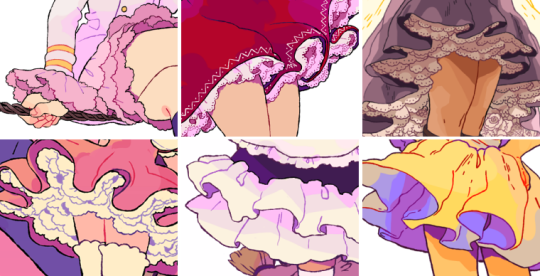
here are some examples of dresses I’ve drawn recently. they might seem complex, but when broken down to their most basic form, they’re actually very simple shapes that follow very similar rules!
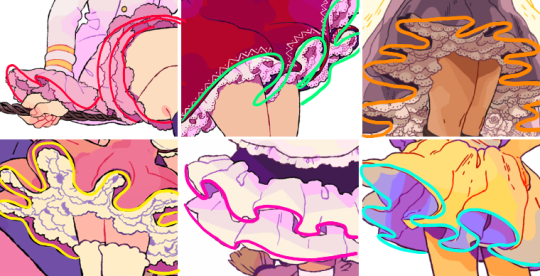
are you seeing any patterns between them? while they do differ a bit, they’re by and large made from the same long line that curves into itself and back out. learning where this line goes and how it changes under different circumstances is learned largely through practice and intuition, but there are some steps you can take to begin building a foundation to work from! (or at least to sort of break down the process!)
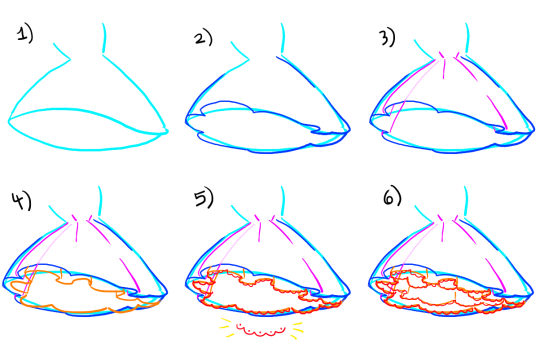
determine the shape/angle of the dress itself.in this example, I’m using a big poofy dress shown from slightly below!
use this as a guide when adding that curving line from before. think of how the fabric folds, and keep in mind that the direction of the curve (and how harsh it appears) depends on where it falls on the dress and the angle at which it’s being viewed from. in this example, it’s more pronounced on the edges, and is facing different directions on the left and the right sides.
wherever cloth folds, wrinkles appear! wrinkles will be more abundant where the cloth is more compact; in this case, that’s toward the waistline. on a dress line this, a fold will originate at the waistline and radiate downward; this means that on an uninterrupted fold, the line that you draw should (if you were to continue it all the way, which is not always necessary) reach cleanly back to the waist. I added one translucent line to help illustrate this idea!
want to add a lace layer? it’s the same concept!! add your basic curving line underneath, keeping in mind that the cloth above will likely mirror whatever it’s falling over. (not perfectly, but somewhat!) so try to keep it a little consistent!
details are easy now!! you can add any sort of lace pattern you want by just tracing over that first line! I used a basic scallop shape here
want even more lace? just repeat step four as many times as you want underneath your last layer of lace!
once you get the hang of this part, figuring out more complex stuff gets much easier! I’m not great at explaining things, but hopefully you were able to come away with some kind of new information, haha…!! I’m wishing you both the best with your art!!!
I got a lot of asks about this so I made a tutorial on how I was able to emulate the 80s aesthetic, please keep in mind I’m not an expert and what I put here is just what I personally did. I hope you guys like it and hope it helps
go crazy kids
This is really cool! I’m definitely gonna give this a go at some point!!
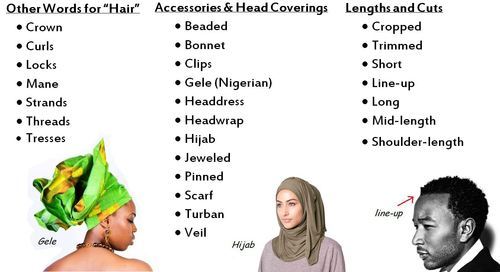
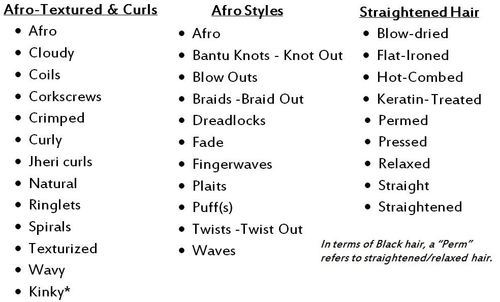
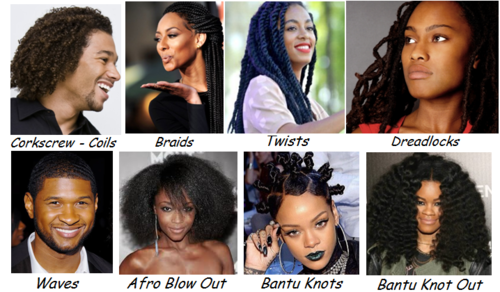
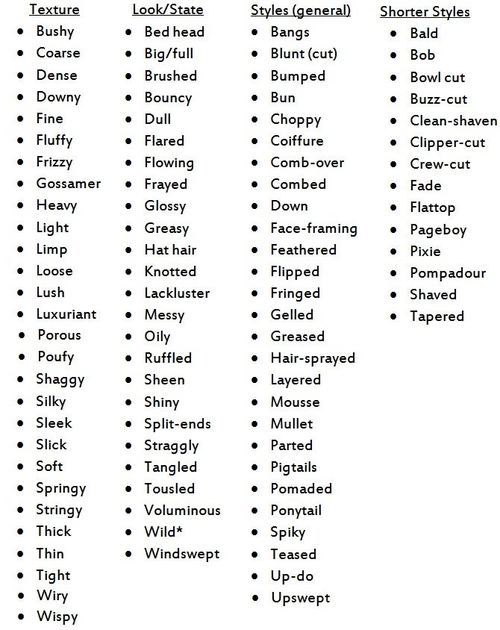
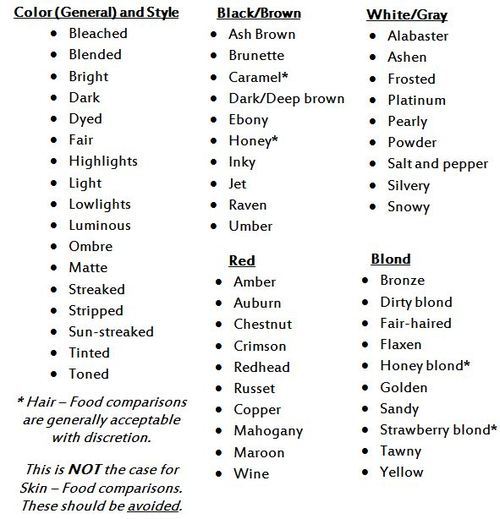
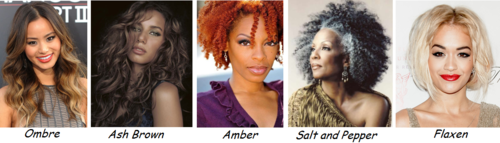
This began as a guide to describing Afro/curly hair but of course, I got carried away. From look and texture of hair, colors and various styles, this guide serves as a thesaurus of sorts for hair, as well as pointers for use in your writing.
Culturally Significant Hair Coverings:
Know the meaning behind head wear and why it’s worn, when and by whom, such as a Native Nation’s headdress, before bestowing a character with it.
Appropriative Hairstyles: Keep in mind that Afro styles should be kept to those in the African Diaspora, such as dreadlocks, cornrows + certain and many braided styles.
Tread carefully describing Afro hair as “wild” “unkempt” “untamed” or any words implying it’s unclean or requires controlling.
“Nappy” and “wooly” are generally words to stay away from, the first having heavy negative connotations for many and the latter, though used in the Holy Bible, is generally not acceptable anymore and comes off as dehumanizing due to Animal connotations.
There are mixed feelings on calling Black hair “kinky.” I’m personally not opposed to the word initself and usage depends on the person’s race (I’m more comfortable with a Black person using it vs. a Non-Black person) as well as their tone and context (if it’s used in a neutral or positive tone vs. negatively/with disdain). Get feedback on your usage, or simply forgo it.
Combination Words: Try combing words to illustrate look of hair. A character with springy coils that dance across her shoulders with every movement, the man with thick silvery hair slicked back into a ponytail…
Mind Perspective: Depending on POV, a character might not know exactly what cornrows or a coiffure style is, at least in name, and it might make more sense if they described the hairdo instead. More defining terms might come from a more knowing source or the wearer themselves. One book I read described a girl’s afro puff as “thick hair pulled up into a cute, curly, poufy thing on top of her head and tied with a yellow ribbon.”
POC & Hair Colors: People of Color’s hair comes in all shades and textures. There are Black people with naturally blond and loosely-textured to straight hair, East Asian people with red hair, and so on. Keep that in mind when coding characters if you tend to rely on hair color alone to denote a character is white vs. a Person of Color.
Related Tropes: There are tropes and discussion related to People of Color, colored hair, and light-colored hair and features.
A simple guide to picking a great color palette. No matter what the colors are, using colors that are certain distances from each other on the color wheel result in a great contrast of colors. The simple color schemes shown above are used in the most popular logos, posters, websites, paintings, and even movies and television.
Halo! A friend of mine asked me to teach him the Gobelins’ way to animate a turn around, so I drew this tutorial. I thought maybe you guys might be interested too c:
My friend @nuclear333 asked me how I shaded hair and I promised her a hair shading tutorial, which of course became a hair…everything…tutorial.
Lots of great tutorials have already been been made on the subject so here’s me throwing in my own two cents. The usual disclaimers apply: this is how I think of hair when I draw it, and is by absolutely no means the only way, or even necessarily a correct way, to do it. I’m always happy to hear about how others approach the same subject!